MQ-135 Gas Sensor Guide
Beginner-friendly wiring and code for Arduino and ESP32, followed by the deeper science, calibration methods, limitations and real-world testing that advanced makers need.
As an Amazon Associate, Practical Answers Hub may earn from qualifying purchases.
Quick verdict
Best for: inexpensive experiments that detect a change in mixed gases or vapours.
Not best for: accurately identifying one gas, measuring trustworthy CO₂ concentration, or building a certified safety alarm.
Beginner friendliness: ★★★★☆
Educational value: ★★★★★
Measurement accuracy without calibration: ★☆☆☆☆
Value for money: ★★★★☆
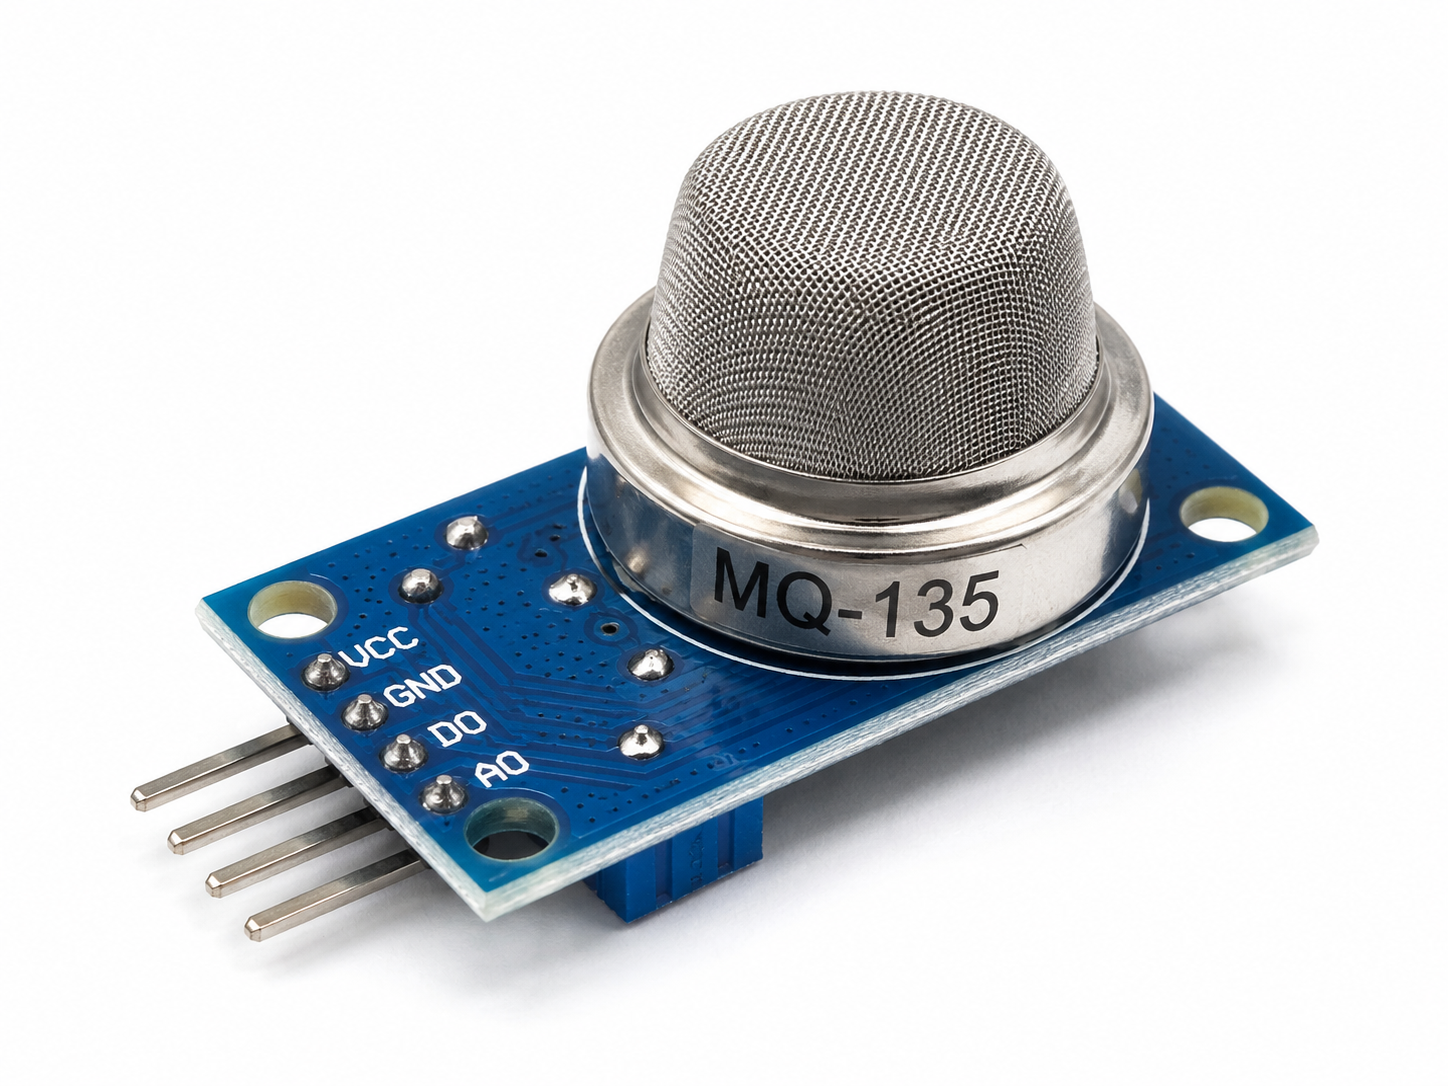
Practical Answers Hub Verdict
Recommended when
- You want a low-cost first gas-sensor project.
- You want to observe relative changes caused by smoke, vapours or fumes.
- You are teaching analogue inputs, sensor response or calibration.
- You accept that it is a broad-response learning sensor.
Choose another sensor when
- You need accurate, true CO₂ measurements.
- You need to identify one specific gas.
- You are building a safety-critical alarm.
- You need very low power consumption or battery operation.
MQ-135 specifications at a glance
| Sensor technology | Heated metal-oxide semiconductor, commonly described as tin dioxide (SnO₂) |
|---|---|
| Typical module supply | 5 V |
| Outputs on common modules | AO analogue voltage and DO digital threshold output |
| Common module pins | VCC, GND, AO and DO |
| Target response | Broad response to several gases and vapours, including ammonia, nitrogen oxides, alcohol vapour, benzene and smoke-related contaminants |
| Heater | Built in; consumes much more power than modern low-power digital sensors |
| Warm-up | Minutes for basic demonstrations; much longer conditioning is needed for repeatable quantitative work |
| Arduino Uno/Nano | Easy to connect to a 5 V analogue input |
| ESP32 | Usable only with voltage protection on AO and usually DO |
Exact values can vary between the bare sensor, the module circuit and different manufacturers. Always check the markings and circuit on your own board.
Important ESP32 warning: AO may damage the analogue pin
The MQ-135 module is normally powered from 5 V. Its AO analogue output can rise well above the safe input range of an ESP32. ESP32 GPIO pins are not 5 V tolerant.
Do not connect AO directly to an ESP32 ADC pin. A high enough voltage can cause incorrect readings, trigger protection structures or permanently damage the microcontroller.
The same caution applies to the module’s DO digital output. On many boards the comparator is powered from 5 V, so a HIGH signal may also be close to 5 V.
This guide uses a resistor divider on AO. For DO, use another divider or a proper logic-level converter.
What is an MQ-135?
Beginner explanation
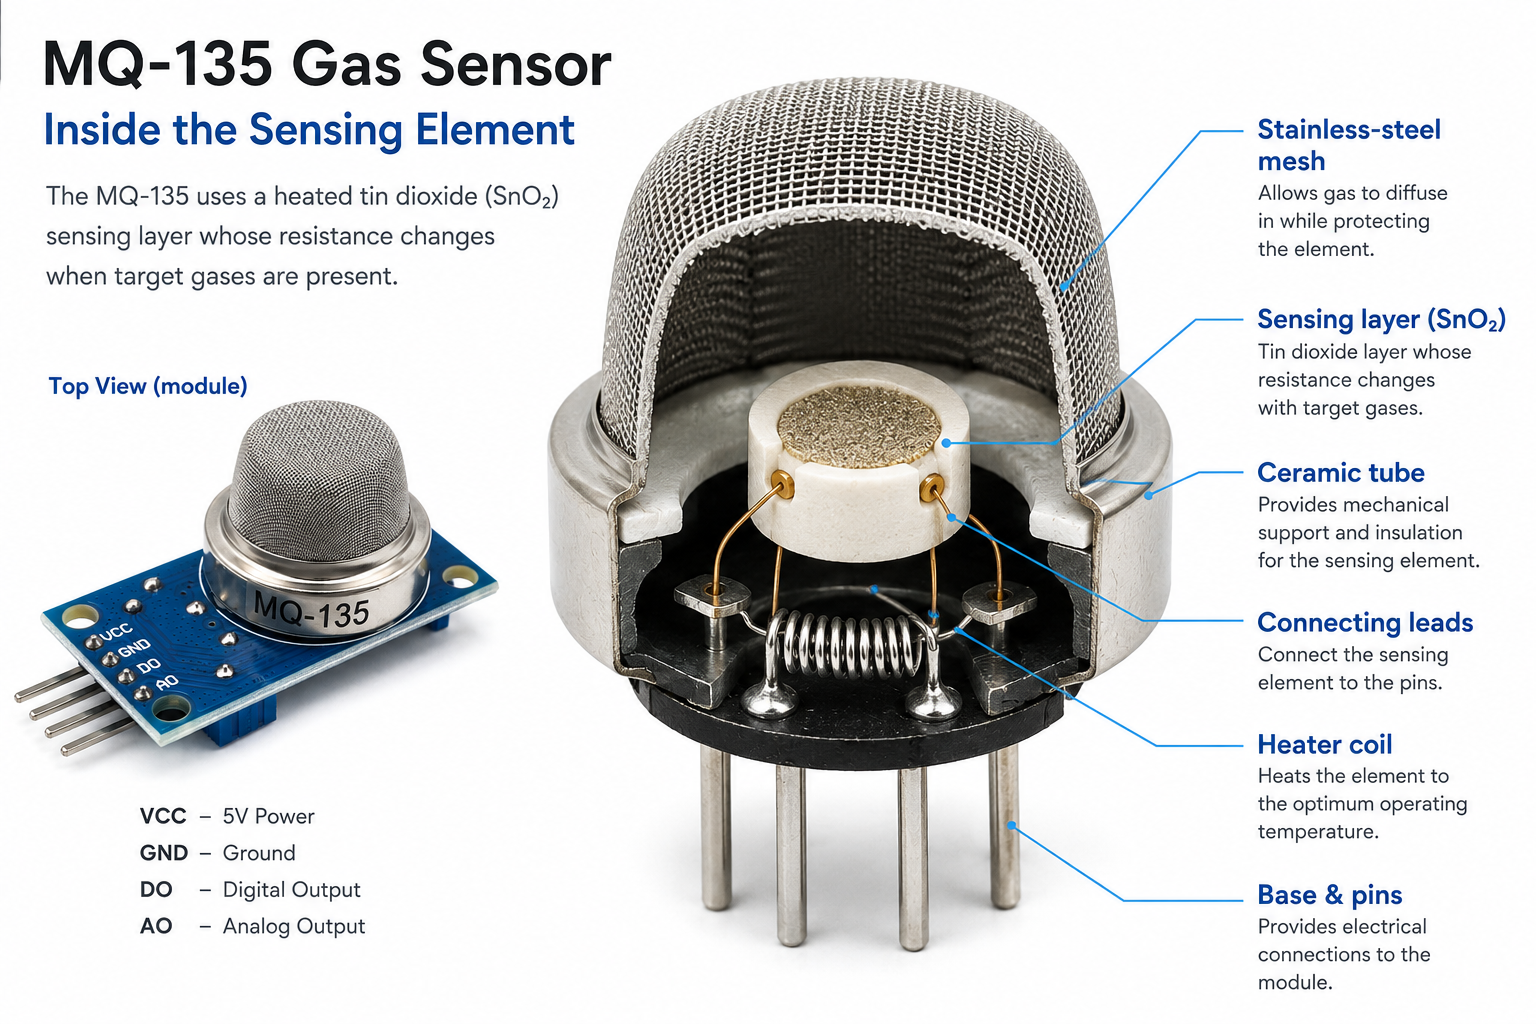
The MQ-135 is a small gas-sensitive component with a heater inside it. When certain gases or vapours reach the hot sensing surface, its electrical resistance changes.
The breakout board turns that change into an analogue voltage. Your Arduino or ESP32 reads the voltage and watches whether it rises or falls.
It is best thought of as a general gas-change detector, rather than a device that can look at the air and tell you exactly which chemical is present.
Advanced explanation
The sensing element is a heated metal-oxide semiconductor. Surface reactions involving adsorbed oxygen and reducing gases alter the material’s conductivity. The sensor resistance is normally written as Rs.
Quantitative interpretation usually uses the ratio Rs/R₀, where R₀ is a reference resistance established under a defined calibration condition. Raw ADC counts alone are not transferable between different modules.
Temperature, humidity, heater history, contamination, load resistance and manufacturing variation all influence the result.
Inside the sensing element
What can it detect?
The MQ-135 responds broadly to several gases and vapours. A high reading does not identify which substance caused it.
Alcohol vapour
Alcohol, perfume and solvent vapours can create a strong response.
Smoke
Incense, combustion smoke and some soldering fumes may increase the reading.
IPA and cleaners
Isopropyl alcohol and cleaning products often cause a rapid, obvious change.
Indoor air changes
Useful for observing trends caused by occupancy, ventilation and mixed contaminants.
Cooking fumes
Frying, grilling and burnt food can produce substantial changes.
Vehicle exhaust
It may respond to exhaust mixtures, but it cannot identify or quantify one exhaust gas.
It does not identify the gas
Different substances can create similar output changes. For genuine CO₂ monitoring, use a dedicated NDIR or photoacoustic CO₂ sensor.
MQ-135 setup and real-world test video
Watch the complete practical guide covering Arduino wiring, protected ESP32 wiring, warm-up behaviour, calibration basics and real-world testing with breath, IPA, perfume, smoke and outdoor air.
If you find this guide useful, consider subscribing for more practical sensor tutorials, wiring guides and real-world testing.
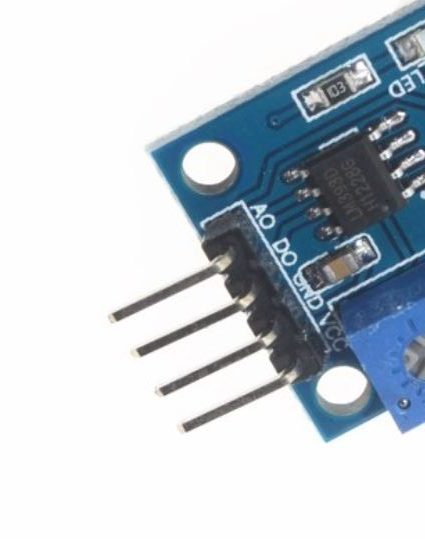
Module pinout
| Pin | Purpose |
|---|---|
| VCC | Normally connected to 5 V to power the heater and module circuitry. |
| GND | Ground. This must be shared with the microcontroller. |
| AO | Analogue voltage representing the sensing circuit output. |
| DO | Digital threshold output from the onboard comparator. Adjust the threshold with the potentiometer. |
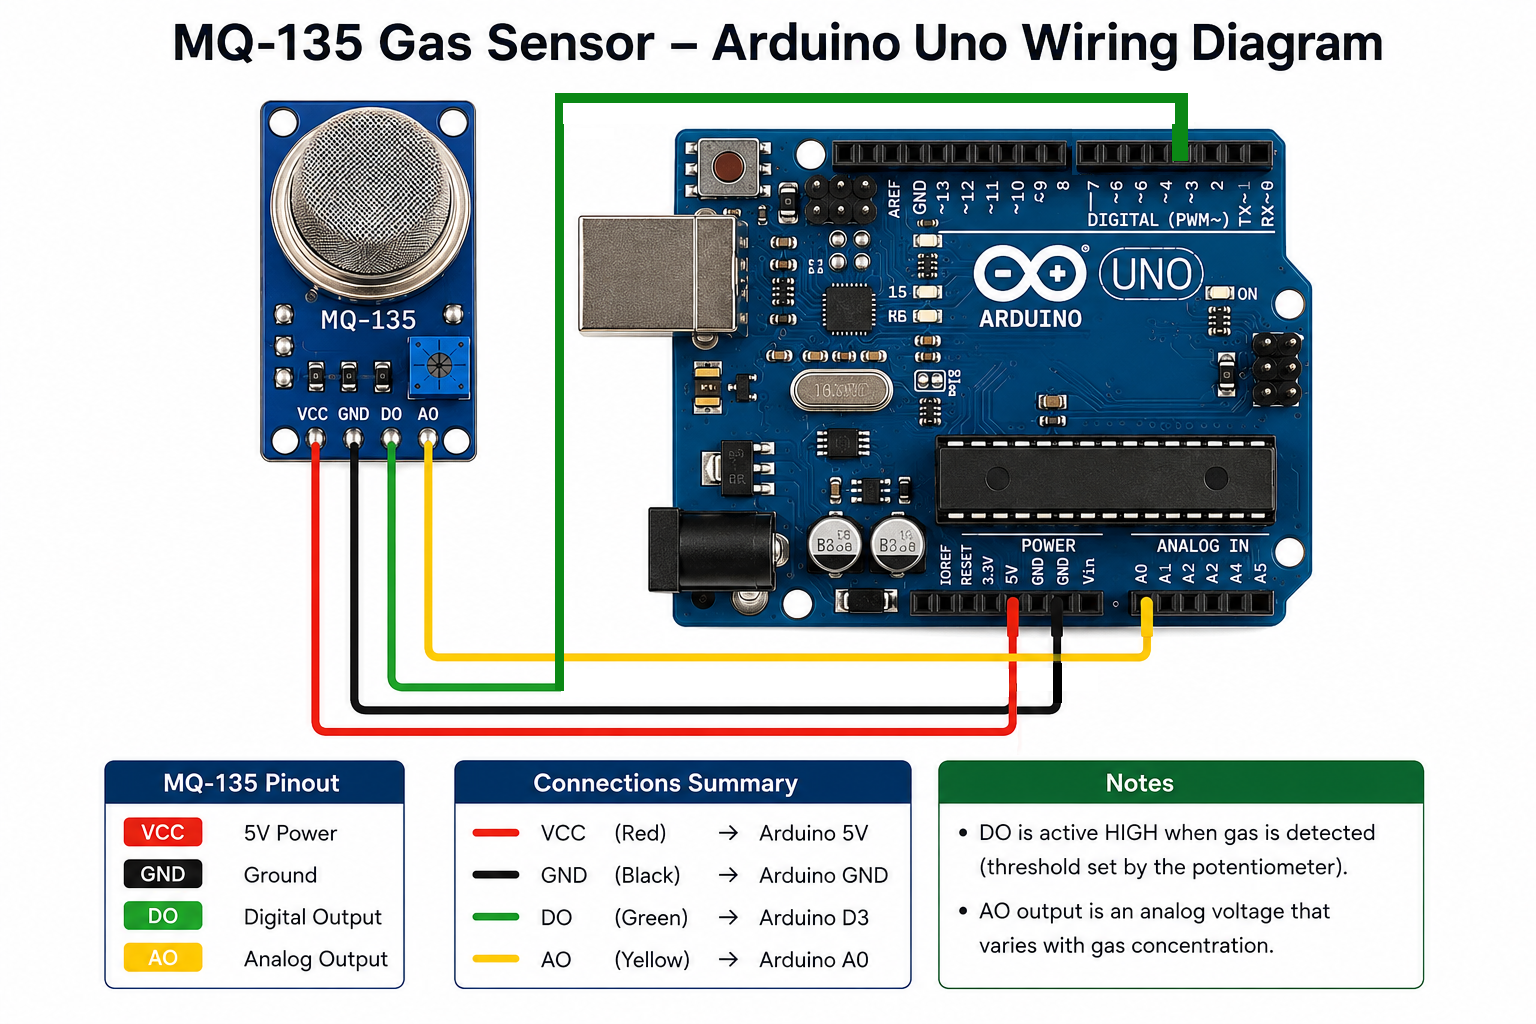
Arduino Uno or Nano wiring
| MQ-135 | Arduino Uno/Nano |
|---|---|
| VCC | 5 V |
| GND | GND |
| AO | A0 |
| DO | D3 digital input |
A classic 5 V Arduino can read the module’s analogue output directly on A0, provided the board and wiring are normal and the input never exceeds the Arduino supply.
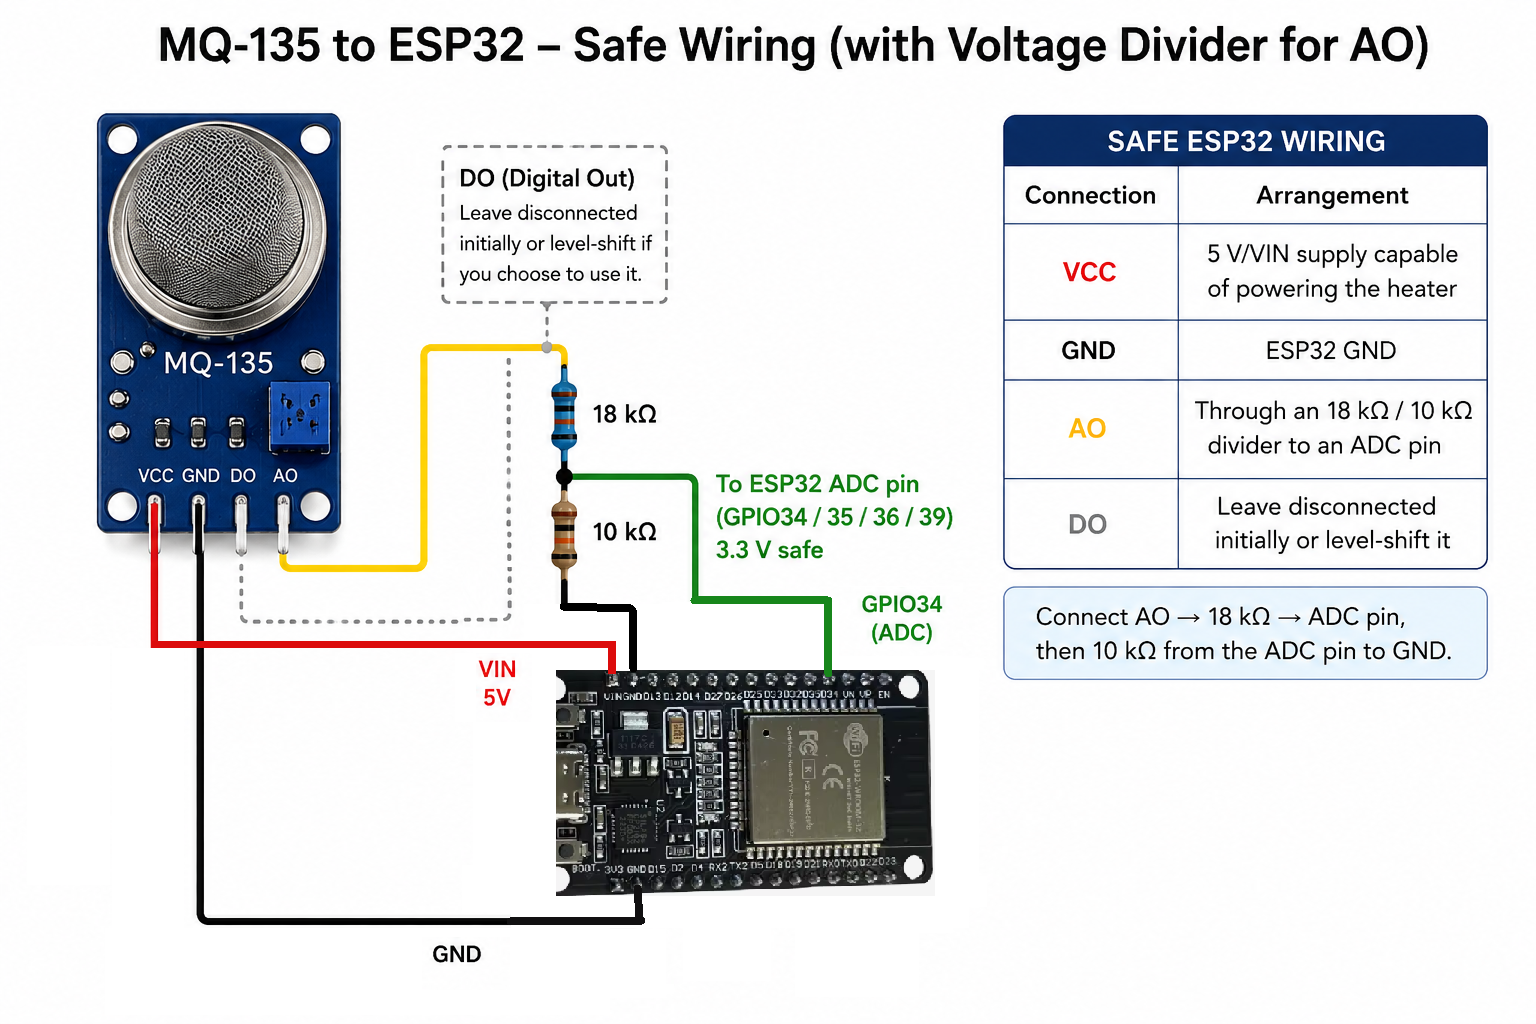
Safe ESP32 wiring
| Connection | ESP32 arrangement |
|---|---|
| MQ-135 VCC | 5 V/VIN supply capable of powering the heater |
| MQ-135 GND | ESP32 GND |
| MQ-135 AO | Through an 18 kΩ / 10 kΩ divider to an ADC pin, for example GPIO 34 on a classic ESP32 |
| MQ-135 DO | Leave disconnected initially, or level-shift it before connecting |
Voltage divider
Connect AO → 18 kΩ resistor → ESP32 ADC pin. Then connect a 10 kΩ resistor from that ADC pin to GND.
This scales a possible 5 V output to approximately 1.79 V, providing generous protection and leaving room for ADC variation.
Beginner Arduino code: read the raw analogue value
const int MQ135_PIN = A0;

void setup() {
  Serial.begin(9600);
  Serial.println("MQ-135 raw reading");
}

void loop() {
  int rawValue = analogRead(MQ135_PIN);

  Serial.print("ADC: ");
  Serial.println(rawValue);

  delay(1000);
}
On a typical Arduino Uno, the result is between 0 and 1023. A changing number means the module is responding, but it does not yet tell you the identity or concentration of a gas.
Beginner ESP32 code: protected analogue input
const int MQ135_PIN = 34;   // Example for classic ESP32 only

void setup() {
  Serial.begin(115200);

  analogReadResolution(12);
  analogSetPinAttenuation(MQ135_PIN, ADC_11db);

  Serial.println("MQ-135 protected ESP32 reading");
}

void loop() {
  int rawValue = analogRead(MQ135_PIN);

  Serial.print("ADC: ");
  Serial.println(rawValue);

  delay(1000);
}
This example assumes AO is connected through the resistor divider described above. Do not use the code as permission to connect a 5 V signal directly.
Advanced calculation: sensor resistance Rs
The common module forms a voltage divider using the sensing resistance and a load resistance. If you know the load resistance and the voltage at AO, you can estimate Rs:
Where:
- Rs is the sensor resistance.
- RL is the module’s load resistance.
- Vc is the sensing circuit supply.
- Vout is the measured analogue output before any external divider.
Do not assume every breakout board uses the same RL. Measure or inspect the resistor on your actual module. When using the ESP32 divider, reconstruct the original AO voltage before applying the equation.
Warm-up, burn-in and calibration
First switch-on
A new sensor may drift substantially while the heater conditions the sensing surface. Do not treat the first readings as calibrated data.
Each measuring session
Allow the heater and output to settle before comparing readings. The time required depends on the quality of result you need.
Calibration
For quantitative work, establish R₀ under a known reference condition and use the relevant sensitivity curve cautiously.
For a simple beginner project, record a stable baseline in the same room and observe relative changes. For advanced concentration estimates, control temperature, humidity, airflow, reference gas and exposure time.
Planned Practical Answers Hub test suite
We will log one reading per second and compare the sensor’s baseline, peak response, recovery time and repeatability. These tests demonstrate response, not certified gas concentration.
| Test | Baseline | Peak | Response time | Recovery | Notes |
|---|---|---|---|---|---|
| Outdoor air | Pending | Pending | Pending | Pending | Reference comparison |
| Indoor room air | Pending | Pending | Pending | Pending | Normal operating baseline |
| Human breath | Pending | Pending | Pending | Pending | Mixed humidity, CO₂ and VOC effects |
| IPA vapour | Pending | Pending | Pending | Pending | Use a small controlled sample away from ignition sources |
| Perfume | Pending | Pending | Pending | Pending | Complex solvent and fragrance mixture |
| Deodorant | Pending | Pending | Pending | Pending | Do not spray directly onto the hot sensor |
| Cooking fumes | Pending | Pending | Pending | Pending | Record distance and exposure time |
| Incense smoke | Pending | Pending | Pending | Pending | Keep ash and flame away from electronics |


Common problems
The value changes constantly
Some movement is normal. Heater cycling, airflow, humidity, power noise and ADC noise all influence the reading. Average several samples.
The ESP32 always reads maximum
The input may be above its measurable range, wired incorrectly or connected without a suitable divider. Disconnect it and verify the voltage with a multimeter.
The digital output never changes
Turn the potentiometer slowly while monitoring the indicator LED and DO. The digital output is only a threshold switch.
Two modules give different values
Manufacturing variation, load resistor values, ageing and contamination make raw readings differ. Calibrate each module separately.
It reports impossible CO₂ values
Generic equations copied from the internet may use the wrong curve, R₀ or assumptions. Treat the MQ-135 as a broad-response sensor unless properly calibrated.
The module becomes warm
That is expected because the sensor contains a heater. Keep flammable vapours controlled and never enclose it without considering heat and airflow.
Safety limitations
This hobby module is not a certified life-safety device. Do not rely on it as the sole detector for carbon monoxide, natural gas, LPG, fire, toxic industrial gases or any hazard where failure could cause injury or property damage.
Use approved alarms and calibrated professional instruments for safety-critical applications.
Practical Answers Hub Tested
The example numbers below are placeholders. Replace them with your own measured results before publication.
| Test | Peak ADC | Recovery | Repeatable? | Notes |
|---|---|---|---|---|
| Fresh air | 220 | Baseline | Yes | Reference reading |
| Breath | 760 | 20 s | Yes | Humidity and mixed gases |
| IPA vapour | 1850 | 35 s | Yes | Very strong response |
| Perfume | 1600 | 55 s | Yes | Strong mixed-vapour response |
| Smoke | 1400 | 3 min | No | Slow recovery |
| Vehicle exhaust | 1100 | 2 min | Variable | Mixed exhaust composition |
Replace these values with your own data before presenting them as PAH test results.
How does it compare?
| Sensor | Best for | Typical cost | Measurement quality |
|---|---|---|---|
| MQ-135 | Mixed gases and learning | Very low | Low without calibration |
| MQ-2 | Smoke and combustible-gas experiments | Very low | Low without calibration |
| MQ-7 | Carbon-monoxide response experiments | Low | Moderate with correct heater cycling |
| ENS160 | Digital indoor-air-quality trends | Moderate | Good for relative IAQ trends |
| SCD40 | True CO₂ measurement | High | High for CO₂ |
Downloads
Coming soon
Coming soon
Coming soon
Reference below
Coming soon
Frequently asked questions
Can the MQ-135 measure CO₂?
It can respond to air changes associated with breath and mixed indoor pollutants, but it is not a selective CO₂ instrument. Use a dedicated CO₂ sensor for meaningful CO₂ measurements.
Can I power it from 3.3 V?
The common module is designed around a 5 V heater and circuit. Supplying 3.3 V changes heater conditions and sensitivity, so results may not match the datasheet or common examples.
Can AO connect directly to an Arduino Uno?
Normally yes, because the Uno analogue input operates over its 0–5 V supply range. Verify the board and never exceed the Arduino’s supply voltage.
Can AO connect directly to an ESP32?
No. Use a voltage divider or suitable buffer because the module output may exceed the ESP32’s safe input voltage.
What does the potentiometer adjust?
It sets the switching threshold for DO. It does not calibrate the analogue output or turn the module into a selective gas meter.
Why does breath cause a large change?
Breath changes humidity and contains CO₂ plus several volatile compounds. The MQ-135 cross-responds, so the result is not caused by one substance alone.
Can it run from a battery?
It can, but the heater consumes significant current. Small batteries will discharge quickly compared with modern low-power sensors.
Is it suitable outdoors?
Only with careful weather protection and airflow design. Temperature, humidity, wind, condensation and contamination can strongly affect readings.
Can it detect mould?
It cannot detect mould directly. It may respond to some volatile compounds in damp environments, but it cannot confirm mould is present.
Can it detect vaping?
It may respond to vapour aerosols and flavouring compounds, but it cannot identify vaping specifically.
Can it detect natural gas?
It may respond to combustible-gas mixtures, but it is not a certified natural-gas alarm.
Does humidity affect readings?
Yes. Humidity can significantly alter the sensor response and contribute to drift.
Does temperature matter?
Yes. Ambient temperature and heater conditions both influence the sensing resistance.
Why is the reading drifting?
Warm-up, humidity, airflow, contamination, power noise and heater history can all cause drift.
Why does my ESP32 read 4095?
The ADC may be over-range, incorrectly wired or receiving too much voltage. Disconnect it and verify the divider with a multimeter.
Why is the digital output always HIGH?
Adjust the comparator potentiometer slowly and verify the DO voltage is safe before connecting it to a 3.3 V controller.
Buy the MQ-135 module used for this guide
Check the current listing, photographs, delivery information and price on Amazon.
Affiliate disclosure: Practical Answers Hub may receive a small commission from qualifying purchases, at no additional cost to you.